Showing posts with label Aero table. Show all posts

Wednesday, November 30, 2011

Innundated with awesomeness

Today I was deluged wih goodness. In no particular order, the postal folk gave to me:

Espgaluda 2 poster

ketsui poster


Ketsui and Armed Police Batrider pcbs

The majority of an ESPGaluda kit

ESPGaluda II kit
An original E2 Marquee holder

Blue's Journey MVS cart and a pile of buttons. With that cart I now own half of the MVS games.

That's an incredible selection of shooters. Three of the four pcbs were in my top 10 most wanted list. But they came at a price. In order to get hold of them (and not bankrupt myself) I let go of my aero table and a few aero related bits and pieces I had. It pained me to see it go but I certainly got some awesome bits and bobs in return. It all happened in a bit of a whirl. Me and the other end of the trade arranged a deal really quickly and within 18 hours of shaking electronic hands it was gone. Quick and sharp probably was best. No long, drawn out goodbyes.

The aero table was a really beautiful cab. I'll miss it. Especially after all the hours and effort I put into it. If I ever own another cocktail table it will be a Jaleco Table Pony. Unless the lady friend talks me into a ms pacman cocktail. If there's ever one for sale near here it may end up heading this way. She's fanatical!

Monday, June 20, 2011

New arrivals - Taito F3 and aero pieces


I finally got to collect my two parcels this evening. These have taken their sweet time getting here! One box contained more or less the last couple of pieces required to complete the second aero table: an MS8 chassis and a control panel. The other contained a couple of new pcbs. I've never owned any F3 stuff before but picked this pair up in a trade. There's a full gekrindan kit (very tatty box though) akkanvader with copy arts and a JP mobo. I've had a few credits on gekrindan and am enjoying it so far. I've popped it in the candy 18 and will let it sit there for a few weeks.

Monday, June 13, 2011

Aero table revival 7


I wired up the second table today. It's pretty simple once you've got your head round it (or had a kindly soul show you). The unconnected bits in the bottom are the monitor inputs and power, speaker cable and a spare 5V.

This table is about done too now. Just need to move two pins in the cp loom, get the monitor sorted and fix up a couple of other tiny wiring segments.

Sunday, June 12, 2011

Aero table revival 6


Table 1 lives!

I got the first table wired up and finished today. Seems to have taken a long time to get to this point. It's lovely to sit and play on it finally. I'll wire up the other shell today perhaps and put up a few photos of where the wires run. Just need the monitor sorting for the other now and the panel for it (in the post). There are a couple of tiny wiring sections for that loom missing too but I should be able to get them fabricated pretty easily if necessary.

Thursday, June 9, 2011

Aero table revival 5

Over the last few days I've built up the other aero table shell.


I've also reapplied the serial number plate and the stickers. The serial plate had a protective film which had clouded. I removed it. I reattached these using bolts rather than the rivet type things that were originally used.
Super glue was enough for the stickers.

Thursday, June 2, 2011

Aero table revival 4

I installed the locks next. No keys for these unfortunately. I also put in the doors, PSU access panel, CP box and coin mech.


With that completed it's time to move onto the lid. The glass is held in place with a small section held in by four bolts. Ensure you place the screws for the mechanism to keep the lid open in their countersunk holes as you attach it.

I then patched up a few little scratches in the black backing of the glass. I used black acrylic paint and a fine brush.

I didn't take so many pictures on the home stretch but here are the steps:

Attach hinges to lid.
Attach the bar that keeps the lid held open for service.
Lift lid into place and carefully attach hinges to cab.
Attach latches in the front edge.

I'd actually put the psu, loom and monitor in before attaching the lid. Much easier to get access. I'll remove the lid again when I get to that stage. It's not too bad doing it with the lid on though.

As of now cab 1 is in this state. Cab two will match it later today once I rebuild it.

Left to do:
test monitor, psu and loom etc out of cab
put in psu, loom etc and secure wiring
put in monitor
put in flimsy bezel last to give you minimum chance of breaking it.

I'll take some more photos when I get round to that bit.

Aero table revival 3

Cable ties for the base in situ.

That's the base section done. I then reassembled the CP box.

Next section is the main white upper. First I attached the cable ties.


Next attach the side decals. It's much easier to do this now before the following step which blocks access.

Attach the degauss / test / service panel. Much easier to do this now when you canlip it over and get to the screws round the back.

The next stage is to attach this section to the base. Plenty of philips head screws to hold it in place.


Aero table revival 2

I had the powder coated Aero Table pieces delivered to me today. Overall I'm pretty happy with them. The blue is a little off the original (a little brighter) but it's a great colour. There are a couple of minor imperfections but not much. I thought I'd put up a few pictures showing the order I rebuilt one of them. May be useful to someone stripping one down if you follow it in reverse. I'm not saying this is the only order, or even the best order to do it. Just the order I did! For the moment I've just rebuilt the shells. The monitor, psu and wiring will be going in in a week or so's time when I have a few friends over for a little get together who'll be able to lend a hand.

Insert coin counter and the metal shielding above. This was a right pain to get out but snapped back in no problem. The shielding is secured with a screw.
Attach legs. There are three height settings.


Attach pcb board runners
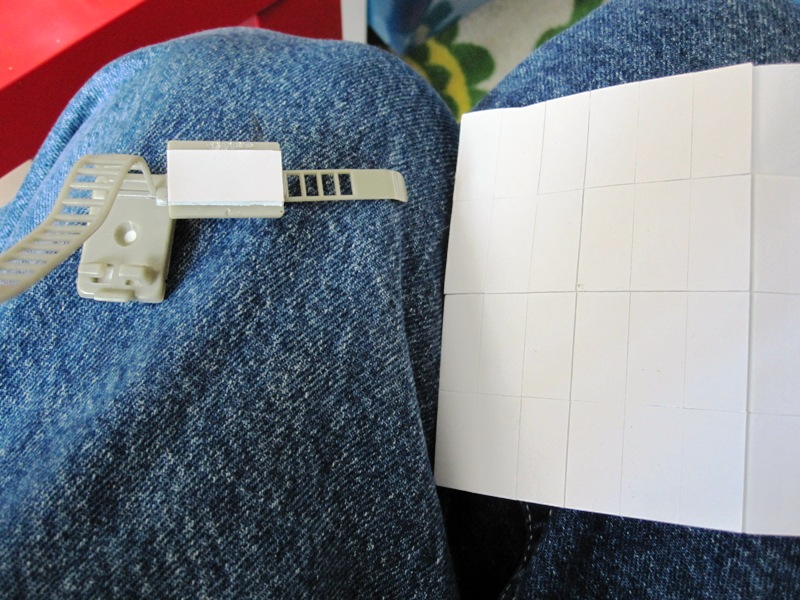
Reattach wire tie ladders. I prised these off when I was stripping the cabs and removed the adhesive pads. I bought some replacement foam with adhesive on both sides and reattached them.

Wednesday, June 1, 2011

New arrival - aero cp looms

These showed up today. Hopefully this is the final piece of the puzzle for Aero Table number 1. All parts sourced just need to get the bits back from the powder coater and build it.

Aero Table number 2 still needs a couple of bits and bobs including some cp looms which are going to be fabricated using these as a model. They are wired for a 5 pin header to use LS32-01s.

I've included a highly professional diagram of the Mate N Lok pin out in case it's of any use to anyone. I'm not sure as yet which button is which or whatever. The stick colours are standard I think. There's a separate 3 pin loom for the start buttons. In the other set of looms the start will be in the empty hole since I don't have any 3 pin Mate n Lok connectors.


Tuesday, May 31, 2011

Aero table revival 1

I'm currently bringing a pair of aero tables back to life.

You can see the condition I received them in and the start of work in this thread on Arcade Otaku. I'll post the rest of the process here.


Today I populated the beautiful control panel with LS40s and sanwa buttons and cleaned up the side art sections.

These side art bits have suffered a fair bit. The rubber is a little perished on one or two of them and the metal section in the middle is corroded. It looks exactly like acid corrosion you may have seen in something you left batteries in. It has the characteristic smell and the powdery residue.


The metal bits were covered in several clear plastic layers. The top layer peeled off easily in one piece (you can just see it being pulled back at the top of htis photo. The layers below were more firmly attached and only peel off in very small sections. I wanted to leave as much as possible as I think it may offer some protection from further damage. On the other hand I want it to look as nice as possible. It's a compromise but I've removed more layers in some parts than others. It looks good unless you study it very closely.

Post clean up they look like this. It's certainly a big improvement but they don't look new.


You can see in the above photo the example of a damaged section. I scraped away at the corroded patches with a blade. this was about as good as I could get them. The tarnished sections can't easily be totally removed, at least not without scratching the panels up pretty badly. Around it you can see where I've removed a section of one of the clear layers but left it where I can. It's not noticeable except in close ups like this.

They aren't perfect but I'm happy enough with them.

Link